Friday 7 February 2014

Scribing the Vertical Courses

You should now have a nice flat piece of filler with little tiny lines running across spaced 1mm apart.

As mentioned before, bricks at 00gauge are 3mm wide. So begin by marking along the very top course with a sharp pencil every 3mm all the way along the wall.

If your measurements have been done correctly then the last brick will be a perfect 3mm and not 2 or 4mm!

Now count down every other course until you reach the last course near the bottom that is in the same order as the top. Obviously this is because of the stretcher bond style of the bricks.


____|____|____|____|____|____|____|.   Top course marked
_______________________________.   Not this
_______________________________.   This
_______________________________.   Not this
_______________________________.   This
_______________________________.   Not this
____|____|____|____|____|____|____|.  Bottom course marked

Then you can line up your steel ruler against the top course and the bottom one and pencil in all the lines in between the alternating courses to the top. Careful you don't fall asleep.

Once you have these alternating courses marked out you can scribe away! I find it easiest to place the pin in the line below the course and place my thumb against my scriber right at the bottom like a little lever. Then a push will drive the pin through the filler upwards and cut the vertical line into it. Don't work too much about the inevitable bits of filler go into the lines. The filler is robust enough to withstand being scrubbed with a toothbrush and soaped up to remove all that at the end.

Once you have scribed these courses you can mark out the other ones with your pencil at the top and bottom.

____|____|____|____|
__|____|____|____|__2nd course marked
____|____|____|____| 
_________________  This one
____|____|____|____| 
_________________  This one
____|____|____|____|
__|____|____|____|__2nd course marked
____|____|____|____| 


Do the same scribing for these courses and that's it. Simple really. Just very repetitive!

As you can see from the above image, some of the bricks are "blown". To do this, simply dig into random areas with your scribing tool.


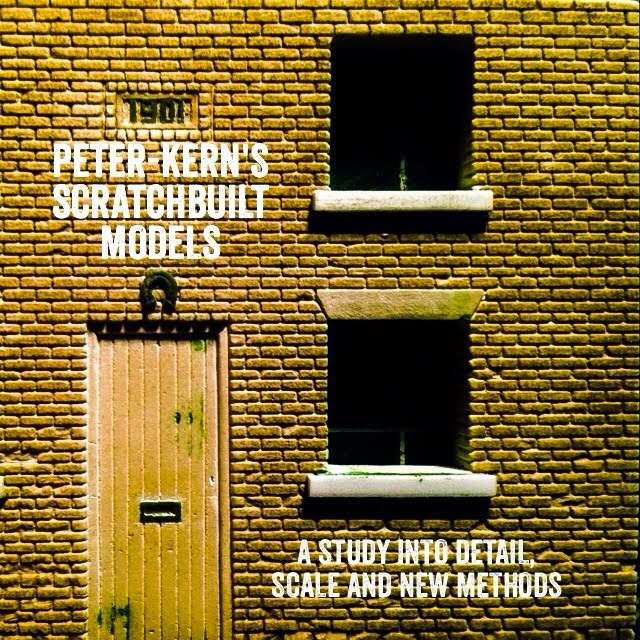
It is at this point you will be able to mark out where your windows and doors will go as you can make a brick course finish perfectly at a window opening without having random half bricks. See image below for an example of this.

Here you can see how the bricks and half bricks end correctly at the edges of windows, the doorframe and the wall edges. This is accurate to real life. Each window and door equals 4 bricks wide. for a wider window simply make it a brick or a half brick wider.


To mark out your windows simply use your ruler and a pencil and the bricks as a guide. Then scribe the edges deeply to define them for the next stage. Which is cutting out the windows and doors.


Thursday 6 February 2014

Scribing the Horizontal Courses

Scribing - enough to make many a man go weak at the knees!

In order to make really nice looking bricks - much patience is needed for this stage. The bricks must run straight and the courses should match up nicely at the corners and around features like windows and doors.

In 4mm scale, your average brick measures 1mm high x 3mm wide. You need to plan out your building/structure so that the measurements are right. So the width of your building needs to be divisible by 3! This way each brick ends correctly at the end of the course.

For example a 60mm wide wall requires 20 bricks across. 61mm is no good as there is 1mm left over.  The next measurement up will be 63mm for the extra whole brick.

Things you need. 

For the scribing you will need the following items:

A scribe.
(This can be made easily from an old paintbrush and a pin. I snapped off the metal at the end of the paintbrush, leaving a wooden handle and then clipped off the head of the pin with some pliers. Then I shoved the handle down into the pin on the patio surface and voila! A decent scribe).

A steel ruler at 12 inches/300mm.

A guide.

The guide is very important for getting even courses. It is simply a bunch of very fine lines spaced 1mm apart for the vertical courses. If you would like a copy of one made to exact measurements digitally please contact me and I will happily email you a copy. 

Some sticky tape.

The method:

Begin by cutting out a piece from your guide that will fit over your wall from top to bottom, but leaving a slight gap at each end to mark the filler in the correct places. Then stick it to the wall with your tape by wrapping it around the bottom and top. The edges need to be tape free.

Then, with your scribe, push a small hole at every 1mm line in the edges of the wall to mark off the 1mm courses running up both sides. Then you can remove your guides and bin them. Line up the holes on each side with the metal rule and run the scribe across with a medium pressure. This can be repeated to deepen the line. Continue up the wall until all the courses are done. If you have done it right then all the last course should finish with a nice row of 1mm bricks at the top and not a half mm or 1.5mm!

This method is tricky to get right and requires patience when lining up the courses. Doing one wall can take longer than you think if it is to be done right.


In the above image you can see on the right hand side one of the l guides I glued with pva to this particular wall. This is the reverse of the technique described on this page, as this piece was scribed before cutting and had space either end for the guides to be placed. If you are cutting the filler first, then the guide can be used in the middle with space either side to mark out the lines.

Next up; scribing the individual bricks


Tuesday 4 February 2014

Mixing and Spreading the Filler

Okay, so now you have the board prepared and ready for the filler it's time for the mucky and smelly bit.

It's worth mentioning before you start that car body filler really stinks. It's a solvent based product that smells until its hardened, so it's best to do this outdoors or suffer the wrath of the better half. I do mine under the veranda.

Also worth mentioning is the speed at which the filler will go hard given the right conditions. Basically the warmer the air temperature the faster it hardens. On a summers day expect the filler to go hard in under 3 minutes. In the winter this can be upwards of 20 minutes!

I find it best to mix and fill in a colder environment and then heat it up with a hair dryer or in the airing cupboard.

So the filler comes in two parts, the main filler in the tub and the hardening compound in a little foil tube. Start by getting hold of an old magazine to mix on. That way once the left over filler is hard you can tear off the page and lob it away.

Glop out a big fat blob of filler about the size of a golf ball and smear it onto the magazine. Next squirt out some hardener about the size of a pea. (Use that ratio for all mix amounts). Mix the two thoroughly using your spreader/spatula for about 30 seconds.

Then take a small amount and spread it thinly onto your board. Make sure the filler is applied evenly to the masking tape bed, ensuring there are no air bubbles. Remember, this is the face of your brick and needs to be the neat part! Once you have covered the area evenly leave it to dry for 15 minutes.

Once dry, it can be sanded slightly ready to take the main fill on the top. This fill needs a fair bit of filler - perhaps three times the amount you used before. Fill up the remaining depth to the level of the ply, then leave to dry again.


It should now look something like the image above.  The second fill does not have to reach past the ply. Simply add the filler in 3 or 4 layers if you wish until the filler is above it. This 5mm is optimum thickness to aid robustness.

Now sand the filler down to the ply level with an 80 grit like so:


This has also been marked out using the paper template ready for removal.

Now this is the dangerous bit as the piece needs to be removed withou scratching the nice textured face hiding underneath. I peeled up the edge of one side of the masking tape and slid a large kitchen knife under it and gently pulled up the tape/filler away bit by bit. Eventually the piece will pop off the board. Remove the tape and you will have this: 

Use your handsaw to cut out the shape, you will find it cuts very nicely but beware - it can be brittle if manhandled heavily. The rough edges can now be sanded down and tidied up.


Next step is the most rewarding but yet the most monotonous. 

Scribing.....!


Making the walls

To make the walls of my cottage I will be using my own method which involves car body filler.

If you wish to try this method out for yourself you will require the following items:

2 pack car body filler, available from halfords or online. It comes in various sizes and is great stuff to sand and scribe.

A flat board bigger than the surface area of the walls you want to make. A piece of melamine shelving is my weapon of choice but a large tile or anything smooth will do.

Some 5mm ply for gauging the depth and done glue to stick it onto the board.

A filler spreader/spatula wide enough to drag along the depth gauge ply.

80grit sandpaper.

A hand saw.

Some 2" masking tape.

A sharp knife.

Start by preparing the board. This can re re used anytime as the filler never touches the board itself.

I cut out two thin prices of 5mm ply. This can be done with anything really, as long as both pieces are the same thickness. I glued mine straight to the board as guide rails and depth gauges for my filler. Then I laid down masking tape onto the flat area between the ply. This is where the filler will go, which can be separated from the board along with the tape as the same time when the filler is dry.
It is important to make sure the tape is lines up like wallpaper with no gap. Failure to get this right results in a line running along the finished surface of the filler. (Note that a fine line will occur but can be scratched of with a flat blade). Also, add some tape to the ply so that it stays at a true 5mm.


The reason for the tape is twofold; the filler is easily removed by slowly peeling off the tape with a knife under it, and the fibre of the tape gives the face of the filler a lovely rough texture for your brickwork.

Now, take your plan and cut it out as a template as in the image above. Test this fits accurately within the ply runners  and then put it to one side for later.

Next we will look at mixing the filler and applying our first fill.

Cottage and workshop diorama.

A few years back I took a job with a company called Plastic Surgeon, who offer cosmetic repairs on all sorts of surfaces (check them out - some of the things they can do are incredible!). Here is a link: Plastic surgeon

It is thanks to them that my eye for detail has improved significantly and I now apply a "think outside the box" mentality to my modelling techniques and I find myself spending more and more time making sure that the details in my models are as fine as possible.

Just recently I joined a few model rail forums and discovered that, despite my best efforts, there are people out there creating buildings to a much higher standard than mine.

Check out this thread: Amazing modelling

So I have started a new diorama based on inspiration from modellers like those in the above link. Originally I wanted to build a cottage and have it resin casted and sold as a finished product. I may well still do this, but I also want to create a nice diorama to showcase my work.

So the cottage began with searching for a suitable donor building. In my line of work travelling is a must and I get to see so many different places that finding something to work off is never difficult. I discovered a nice house on a country road in Staffordshire and remembered the area. Then I went into google maps when I got home and printed off some screen grabs as reference.


You can also see the plan that I made in Photoshop that allows the measurements to be accurate to 100%. This allows for accurate brick courses and windows aperture size.